
اليكم البرنامج المساعد خادم JellyfinDream
Plugin] JellyfinDream-Server


Jellyfin server plugin for Dreambox One, Two and 9xx.

بعد التثبيت ، لا يزال خادم Jellyfin بحاجة إلى التثبيت. استخدم الزر الأزرق لهذا ، سيتم بعد ذلك تقديم الإصدار الثابت الحالي.
After installation, the Jellyfin server still needs to be installed.
Use the blue button for this, the current stable version will then be offered.

يمكنك الآن تثبيت الإصدار المعروض باستخدام OK
Now you can install the offered version with OK.

إذا قمت بتثبيت تحديث لخادم Jellyfin ، فسيتم حفظ الإصدار القديم كنسخة احتياطية ، لذلك يمكنك الرجوع إلى إصدار واحد في حالة وجود مشاكل في الإصدار الجديد. إذا كان هناك نسخة احتياطية ، فسيتم تخصيص وظيفة استعادة النسخ الاحتياطي للزر الأحمر يحتوي زر المعلومات على وظيفتين ، عندما يكون خادم Jellyfin نشطًا ، تحصل على معلومات حول الخادم. بعد بدء تشغيل الخادم ، قد يستغرق عرض المعلومات من 4 إلى 10 ثوانٍ
If you install an update for the Jellyfin Server, the old version will be saved as a backup, so you could go back one version in case there are problems with a new version.
If there is a backup, the red button will be assigned the backup restore function
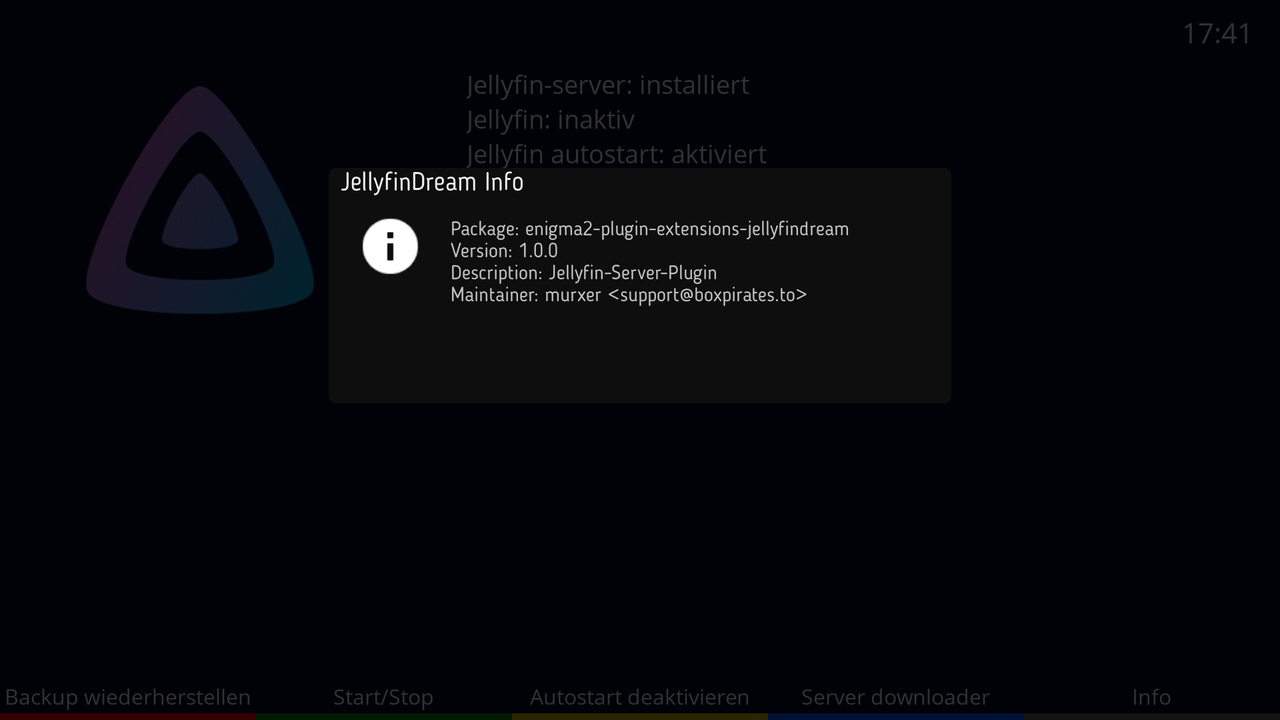
The info button has 2 functions, when the Jellyfin server is active you get information about the server.
After starting the server, it can take 4 to 10 seconds for the information to be displayed.

سترى أيضًا عنوان URL هنا ، والذي يتعين عليك بعد ذلك الاتصال به للتهيئة
You will also see the URL here, which you then have to call up for configuration.
http://IP-of-the-Dreambox:8096
إذا لم يكن خادم Jellyfin نشطًا ، فستتلقى معلومات حول المكون الإضافي.
If the Jellyfin server is not active, you will receive information about the plugin.

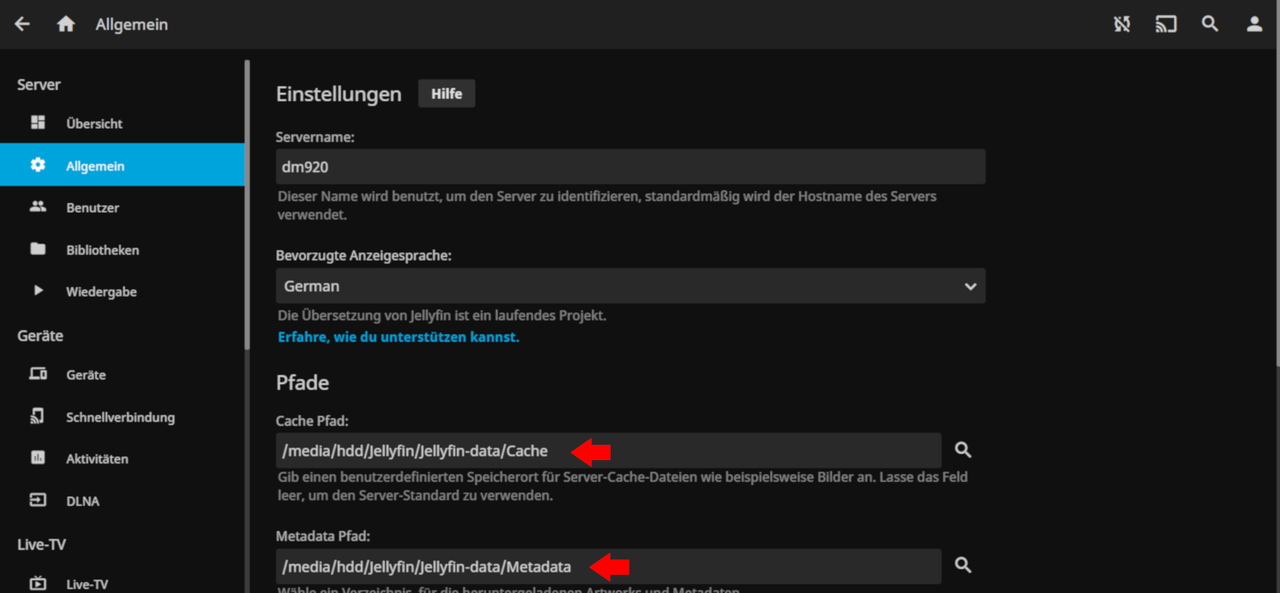
تم تثبيت الخادم نفسه في / data / jellyfin-server. إذا تم إنشاء نسخة احتياطية ، فستجد مجلدًا آخر في / data يسمى jellyfin-server_backup. عند تثبيت تحديث ، سيتم تطبيق الإعدادات الخاصة بك ، ولا يلزم أخذ أي شيء في الاعتبار هنا. انتباه: يجب أن تتأكد من أنك لا تفرط في ملء ذاكرتك الداخلية ، أنصحك بالاستعانة بمصادر خارجية لجميع البيانات على القرص الصلب. لقد قمت بإعداد DM920 كخادم وعميل لهذا الغرض ، فنحن نرحب بك للقيام بذلك ، ولكن يمكنك أيضًا اختيار المجلدات بحرية: - تركيب قرص ك / media / hdd - مجلد تم إنشاؤه باستخدام / media / hdd / jellyfin - إنشاء المجلدات الفرعية التالية: / media / hdd / jellyfin / jellyfin-data / media / hdd / jellyfin / Jellyfin-data / Cache media / hdd / jellyfin / jellyfin-data / m*etadata / media / hdd / jellyfin / transcodes في / media / hdd / jellyfin / Media ، قمت هنا بإنشاء مجلد الفيلم ومجلد المسلسل. يمكنك الآن ضبط الإعدادات في المتصفح وسيتم بعد ذلك تبديل جميع البيانات
/media/hdd/jellyfin/Jellyfin-dataThe server itself is installed in /data/jellyfin-server.
If a backup is created then you will find another folder in /data called jellyfin-server_backup.
When installing an update, your settings will be applied, nothing needs to be considered here.
Attention
You have to make sure that you don't overfill your internal memory, I would advise you to outsource all data to a hard drive.
I have set up the DM920 as a server and client for this purpose, you are welcome to do this, but you can also choose the folders freely
- Mounted a disk as /media/hdd
- A folder created with /media/hdd/jellyfin
- Created the following sub folders:
- /media/hdd/jellyfin/Jellyfin-data/Cache
- media/hdd/jellyfin/Jellyfin-data/m*etadata
- /media/hdd/jellyfin/transcodes
Now you can adjust the settings in the browser and all data will then be swapped out.


في / media / hdd / jellyfin / Media ، قمت هنا بإنشاء مجلد الفيلم ومجلد المسلسل. يمكنك الآن ضبط الإعدادات في المتصفح وسيتم بعد ذلك تبديل جميع البيانات. عد الآن إلى تحويل الشفرة ، فهو يعمل فقط مع إصدار ffmpeg الحالي ، ولا يوجد حاليًا إصدار حالي في الخلاصات. لكن نسخة ffmpeg كافية للتمكن من بث بث مباشر. كاختبار ، اختبرت إصدار ffmpeg الحالي على 920 و Two. إنه يعمل لكليهما ، ولكن هنا سيتعين عليك زيادة المخزن المؤقت قليلاً ، وإلا سيكون هناك تسرب. لكننا في الواقع نستخدم فقط البث المباشر أو البث المباشر ، والذي يعمل بشكل جيد مع كلا الصندوقين. لذلك يمكنك استخدام الخادم ثم EmbyDream-DEB أو EmbyDream-IPK كمكوِّن إضافي للعميل
 ثم يتم استخدام IP 127.0.0.1 وتحديد التشغيل المباشر في EmbyDream. التثبيت لـ OE2.5 و OE2.6: بالنسبة لأولئك الذين قاموا بالفعل بتثبيت PlexDream أو EmbyDream من الخلاصة الجديدة عبر مثبت wget ، يجب أن يظهر JellyfinDream بالفعل في متصفح الوظائف الإضافية. إذا لم يكن الأمر كذلك ، فقم بتشغيل تحديث apt-get من وحدة التحكم. يمكن تثبيت المكون الإضافي باستخدام برنامج التثبيت (قابل للتحديث ؛)
In /media/hdd/jellyfin/Media here I created my movie folder and series folder.
Now you can adjust the settings in the browser and all data will then be swapped out.
Now back to transcoding, it only works with a current ffmpeg version, there is currently no current version on the feeds. But the ffmpeg version is sufficient to be able to stream a live stream.
As a test, I tested a current ffmpeg version on the 920 and Two.
It works for both, but here you would have to increase the buffer a bit, otherwise there will be dropouts.
But we actually only use a direct stream or a live stream, which works well with both boxes.
So you could use the server and then EmbyDream-DEB or EmbyDream-IPK as a client plugin

Here is then used as IP 127.0.0.1 and select direct play in EmbyDream.
Installation for OE2.5 and OE2.6:
For those who have already installed PlexDream or EmbyDream from the new feed via the wget installer,
JellyfinDream should already appear in the add-on browser.
If not, run an apt-get update from the console.
The plugin can be installed with Installer (updateable
 ):
):Code

